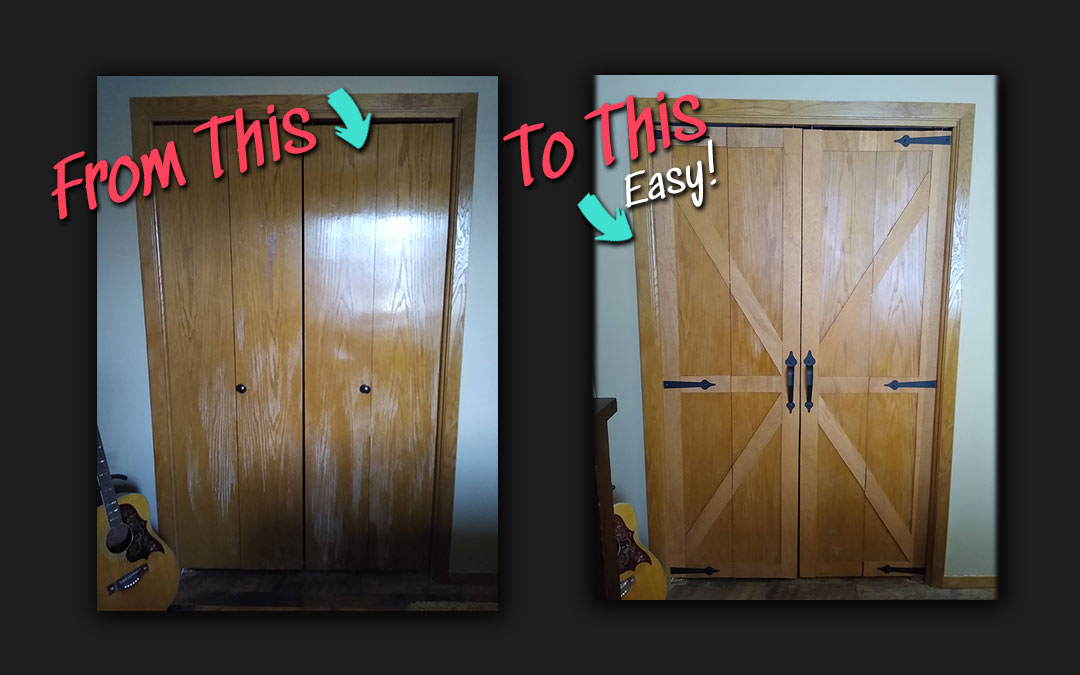
These spots were really starting to annoy me. It was time to upgrade. I jumped online to see what options were out there to upgrade bi-fold doors. They’re not cheap – they ones I liked were $200 and more for a new set! So I decided to check out Pinterest for some DIY ideas. I stumbled across the barn door look and was hooked!
A Cheap, Yet Custom Option?
What was the cheapest way I could make these bi-fold doors look like barn doors without spending an arm and leg, and also keep them from weighing too much by adding extra material to them? After all, they are hollow core and pretty lightweight, so too much weight may bring them crashing down.
I ended up going with some 1/5″ thick plywood from Home Depot. It was the cheapest option out there at under $14 a sheet, and the grain was overall clean and nice looking.
Tools and Other Items You Will Need
- A saw – I used a circular saw, but a table saw would work great to cut the strips. You may be able to even use a jig saw.
- A recipricating saw is what I used to cut the hinges.
- Mitre saw is helpful for the mitre cuts.
- A brad nailer
- Sand paper and/or orbital sander
- Staple gun with brad nails
- A pencil
- Speed square or measuring tape
- 1/5″ 4′ x 8′ plywood from Home Depot
- Stain or paint of your choice; I used Antique Maple gel stain
- Wood glue, stain brushes, rags, paint scraper, mineral spirits
- Brad nails
- Hinges
- Optional: Paint stripper
- For safety: gloves, eye/ear protection, respirator

1) The first thing I had to do was remove and prep the bi-fold doors. If your doors have moisture marks on them like mine did, you’ll want to strip with paint stripper and a scraper along with some sand paper to sand them carefully, so not to damage them. This takes some time and you will want to wear a mask and be in a well ventilated area. If your doors don’t need this, but have polyeurethane on them, you may want to pick some up for your trim, so it matches up better.
[Another option, if you don’t want to subject yourself to the fumes of paint stripper, you could add an under layer of strips, maybe wider under your trim. You’ll most likely need another 4×8 sheet, but for only $13-$14, it may be worth in and give you more of the look you are going for. I’m considering this option for my next set of bi-fold doors.]
2) Once the sanding is done, you’ll want to clean the doors with mineral spirits, let them dry well and apply the stain or paint of your choice.
It was during this step that I also wanted to decide how wide I would want the trim (strips). I decided on 3.25 inches. You can go with whatever width you desire and even a wider widths for the middle and top sections, which is what I plan on doing for my next set.
I had Home Depot do two cuts on the plywood sheets for me so I could fit them in my car. I just had to make sure they were cut at at least 67″ long to run the height of each door. When I got home I cut the boards into strips.

Cutting & Staining the Strips
3) It’s a good idea to cut some extra strips, because if you are like me you may mess up on mitre cuts when you get the that step.
For each strip, I used another straight strip clamped down on top of the sheet, and ran my saw along it as a guide. This worked great, and each strip came out looking very good.
4) It’s time to lightly sand and stain. I used some mineral spirits to clean the boards before applying the stain.

5) Now you can place your strips on doors in a dry fit fashion. Measure out where you will want them and pencil mark where you want the middle trim to be placed. In my case I wanted the holes from the old knobs covered, so a few inches below dead center worked for me.
Attaching the Trim/Strips
7) Once I had all the trim placed on the doors, I used wood glue along with some small 3/4″ brad nails in my electric stapler/brad nailer. You could also use longer brad nails, with an air compressor, but since the plywood is only a few millimeters thick, and my doors were hollow, this option worked fine. I was able to tap in any protruding nails with a hammer.
Cutting Hinges in Half?
Since my door panels were only 12″ wide, and I had 16″ hinges from Amazon, I decided to cut them in half. There are several options out the for 3″, 4″ and 6″ gate hinges, but nothing local had them in stock.
I also decided on these hinges because they came with handles and nice black powder coated screws. So it was two less things to have to find, purchase and paint.
8) It was super easy to cut the hinges. I used a pencil and speed squared and marked at about 8.25″ and cut with my recipricating saw with a metal blade. With the scrap halves, I feel I can evenutally drill a second hole in them and use them for another project down the road. I’ll be sure to share once I do!
Attach the Hinges & Handles
9) It’s important to drill pilot holes before attaching the handles and hinges at this point, and after all your hard work. You don’t want the trim to split on you at this point in the project.


Final Thoughts
Overall, I’m very happy with the way this project turned out. Since I had all the tools and even some of the products on hand, it was definitly cheaper than buying new bifold doors.
And since three other rooms in my house have bifold doors, I plan on doing the same process to them, with maybe a few alterations. Ultimately, I’ll just need that nice guy from Home Depot to cut me another $14 sheet of plywood for each set of my other bifold doors.
And yes, I plan on using the half of the hinges too for one of the rooms, so that will also save some cash and give a slightly different look to the doors. I’ll be sure to share pictures if you’re interested.
If you found this blog post interesting, helpful or inspiring, please leave a comment and don’t forget to follow me on Facebook.